


NOTE: A previous version of this post had enough glaring errors that I have chosen to rewrite it. It’s not often I hit the post button faster than my error checking and research, but I am alas, only human. Thank you to Yinghua (Sandy) Zeng for correcting me, and doing so in such a polite way. I would not have been upset had she done so publicly, but out of respect she chose to do it privately. I, however would like to acknowledge that I made some assumptions about the processes in her post which were incorrect and they have also been corrected in this post.
First let me give a couple shout outs: I would like to thank Yinghua (Sandy) Zeng and Adam Gross for the road they have paved in the AdminService area. Adam’s resources on the AdminService available here and Sandy’s resource on accessing the AdminService via the CMG available here have been instrumental to this post. I don’t wish to recreate the wheel as both Adam and Sandy have done a phenomenal job. My goal with this post is to explore the various options when connecting to the AdminService over the Cloud Management Gateway.
Getting Setup
The basics to getting access to the AdminService via CMG are as follows:
- A properly configured Cloud Management Gateway (preferably with a cert from a public CA like Let’s Encrypt)
- SMS Provider Role configured to allow AdminService traffic through the CMG
- An Azure AD app registration (the focus of this post)
- Account(s) synchronized to Azure AD to get the necessary token
Configuring the SMS Provider Role
This post assumes that you have a Cloud Management Gateway already configured. If you do not, Microsoft has a great guide available here. When you’ve gone through the process of creating a Cloud Management Gateway you’ll remember that you’ve had to allow access to various services (MP/SUP) via the Cloud Management Gateway. To enable AdminService access, we need to do the same thing for the SMS Provider (likely on your primary site) by checking a box. The ConfigMgr development team makes these things almost too easy :)
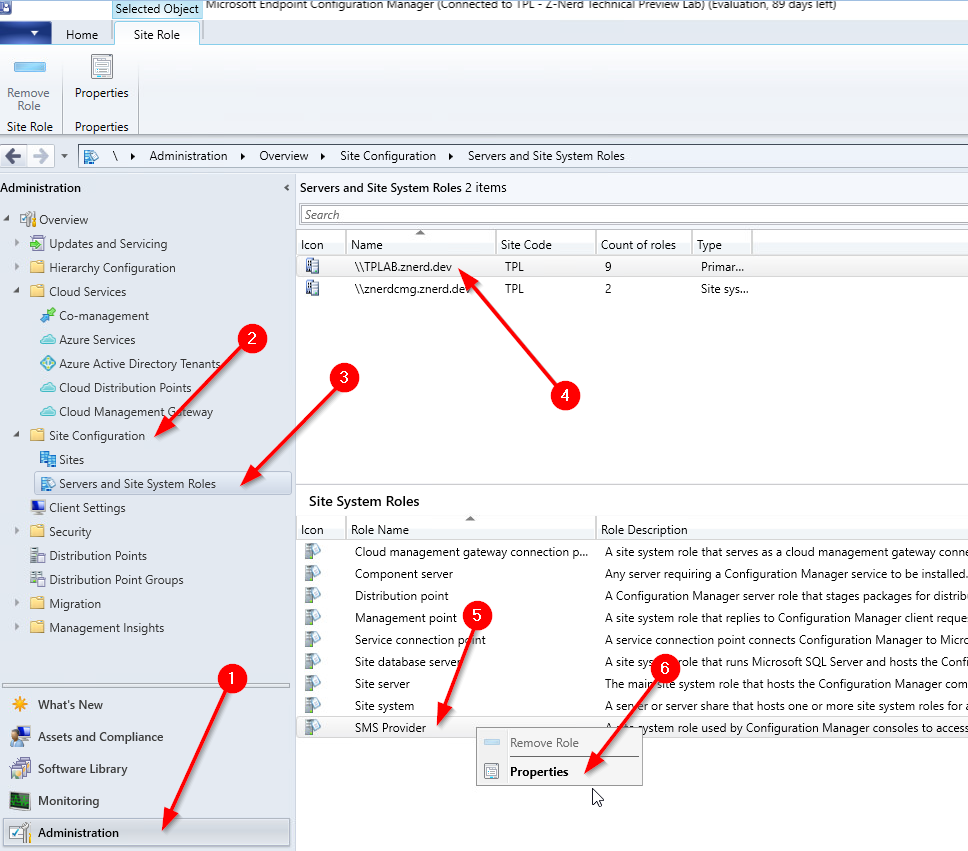
Launch your ConfigMgr console, go to the “Administration” blade, expand “Site Configuration”, click on “Servers and Site System Roles”, click on a site system with the SMS Provider role, right-click on the SMS Provider role and then select Properties.
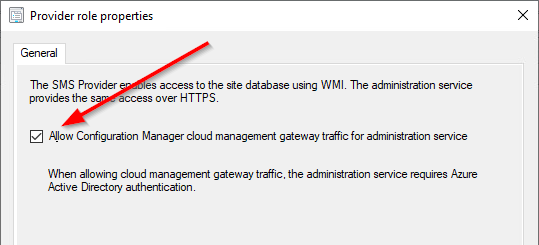
Once inside we just need to check the box to “Allow Configuration Manager cloud management gateway traffic for administration service”
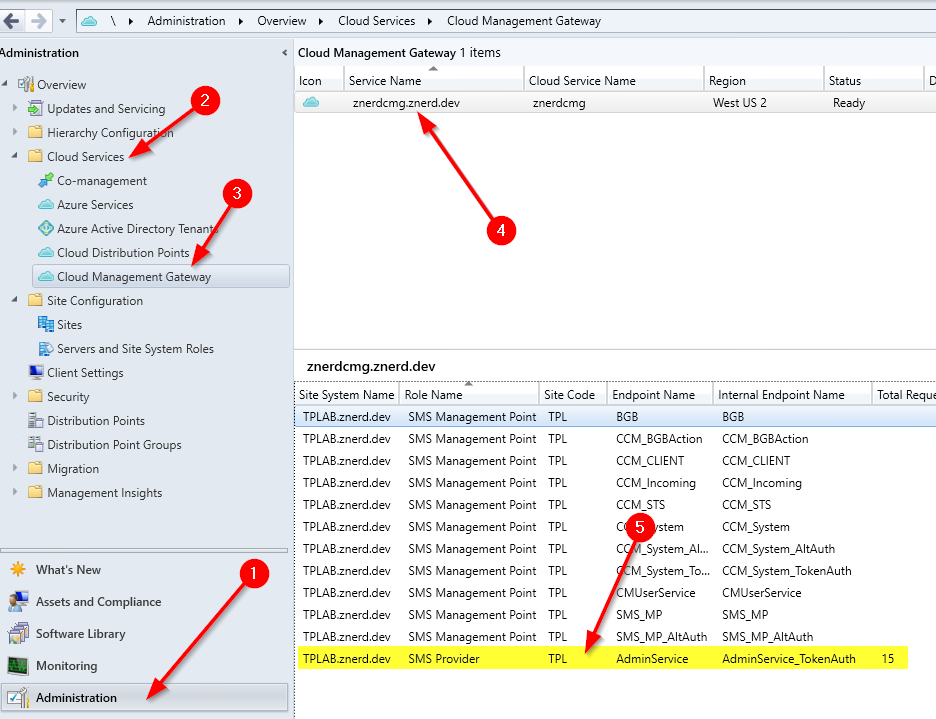
We can validate that the endpoint is available by looking at the Cloud Management Gateway’s “Role Endpoints” tab. On the “Administration” blade expand “Cloud Services”, select “Cloud Management Gateway”, select your Cloud Management Gateway, and then select the “Role Endpoints” tab. You should see a role with the name “SMS Provider” with an endpoint name of “AdminService”
Once we have the endpoint configured, we need to create a way to access it. That’s where the meat and potatoes of this post come into play.
Azure AD App Registrations
So what exactly is an App Registration? When you register an application with Azure AD you are essentially allowing your users to authenticate with their Azure AD credentials (or on-prem if Azure AD Connect is synchronizing your on-prem accounts) to access the application. In many cases this would be a line of business (LOB) application you have developed where you want access to some user data like email, contacts, or calendar.
In our case, we’ll be using the application registration to facilitate Authentication (validating that we are who we say we are) and also provide an Authorization token (bearer token) to the AdminService through the Cloud Management Gateway which can then be used to determine whether we are Authorized to access the resource or not. We have two different ways in which we can achieve this goal:
- Confidential Client
- Public Client
Confidential vs. Public Clients
Since many of us are not developers I’m going to give the shorthand version of the difference between the two for our purposes (this will not apply to circumstances where an App Registration is used outside of the context of CMG)
If you need to access the Cloud Management Gateway without an interactive logon prompt (where you enter your credentials on the Microsoft logon page) as would be the case with a script running as part of a task sequence, you’ll want to use a public client. This has limitations however - the account that you use to access the Cloud Management Gateway cannot require MFA for sign-in, and you have to authorize the application permissions on behalf of your organization (or the user) in advance of using it. Additionally, you must use an account that has been synchronized with Azure AD - you cannot use an account which was created in Azure AD only (also known as managed users). This process must also be run from a domain joined (AD or AAD) computer.
If you are developing a script or other front-end application which should run in the context of the executing user, then you will want to use a confidential client. Confidential clients have the limitation that the authentication process needs to run interactively (the user needs to input their credentials and possibly provide the MFA response) but have the added benefit of allowing conditional access to control when and where the application can be used.
Creating Your Application Registration
When you created your Cloud Management Gateway, two App Registrations were created in your Azure AD tenant. One which is a “Native” app registration for client connectivity and one which is a “Web” app registration which registers the web API with AAD. To manage access to the AdminService we will want to create a third app registration.
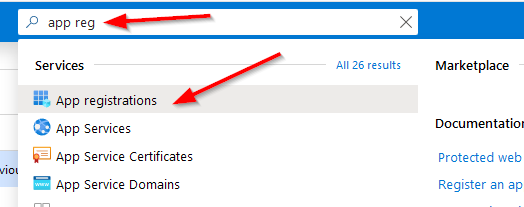
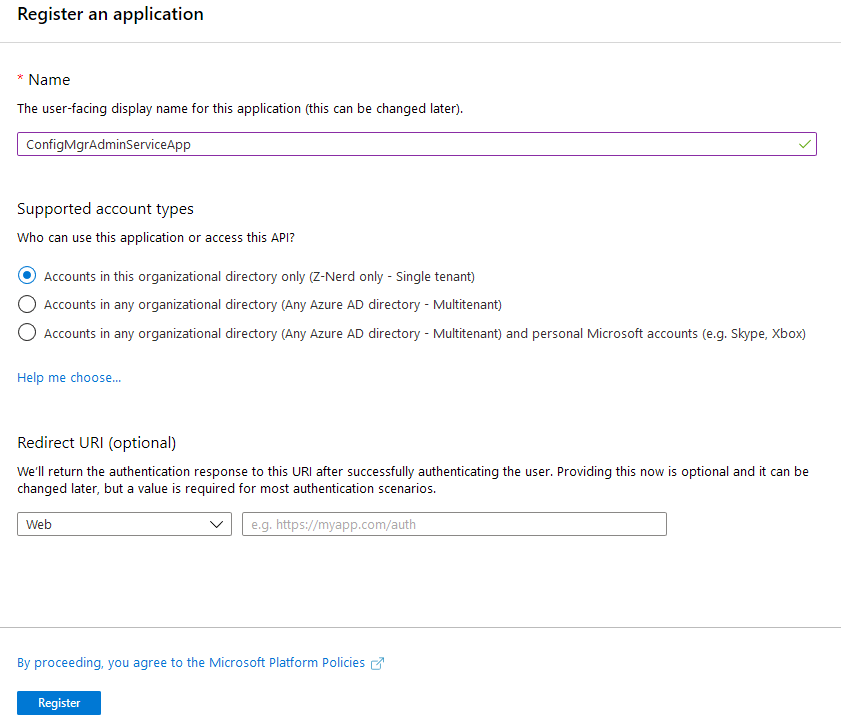
Logon to your Azure Portal and search for and select “App Registrations”.
On the App Registrations page create a new registration. You can name it whatever you like provided that it is unique in your tenant. You don’t need to configure a Redirect URI at this point.
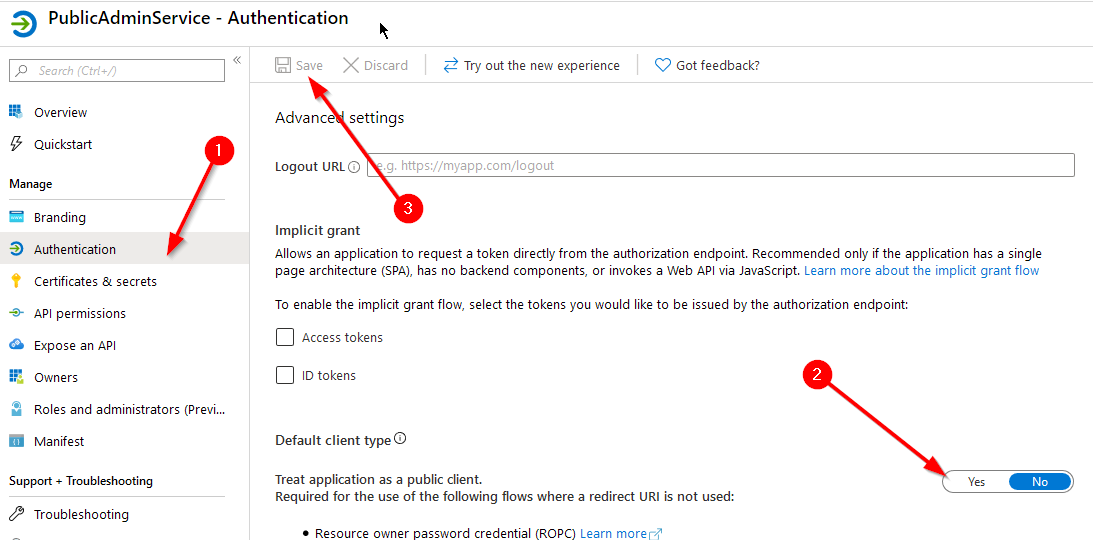
Now we need to decide whether to create a public or confidential application. This is handled by a simple switch. On the “Authentication” tab, locate the “Treat application as a public client” switch. To make it public, change the switch to yes, otherwise leave it as is.
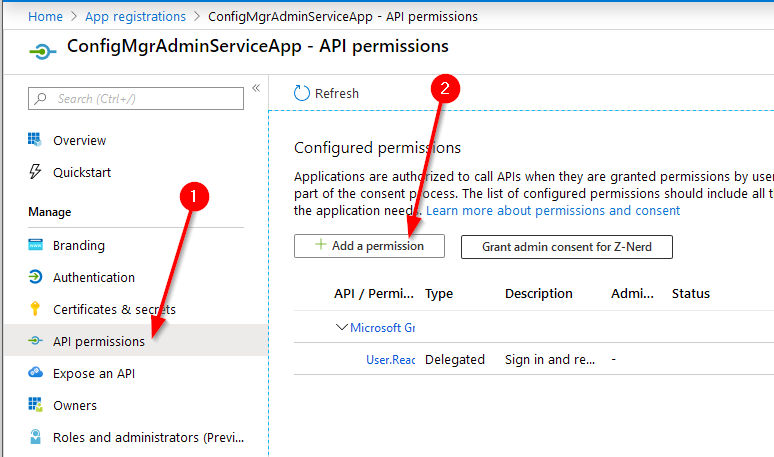
Now we need to give it permissions to access the CMG application. By default the API permissions given to a new app registration allow the user to sign in and read a user profile. Open the app registration in Azure AD, select “API permissions” and then press “+ Add a permission”
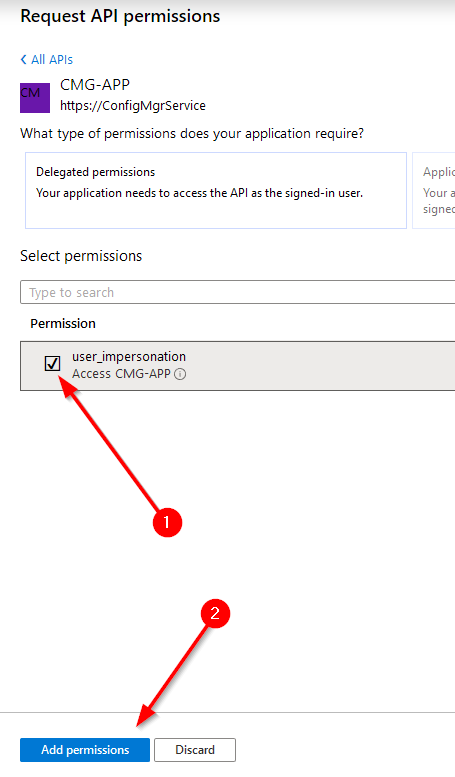
Click on “APIs my organization uses” and search for the name of the CMG app registration which you created when you setup you CMG. Mine is called “CMG-APP”. Select it, check the box for “user_impersonation” and then press “Add permissions”
Next, you can grant administrative consent for these permissions on the application. Press the “Grant admin consent for TENANTNAME” button. You’ll be walked through the process of logging in with an administrative account to grant access for your environment. If you are using a public application this is a necessity as the script will not be able to consent on behalf of the user non-interactively.
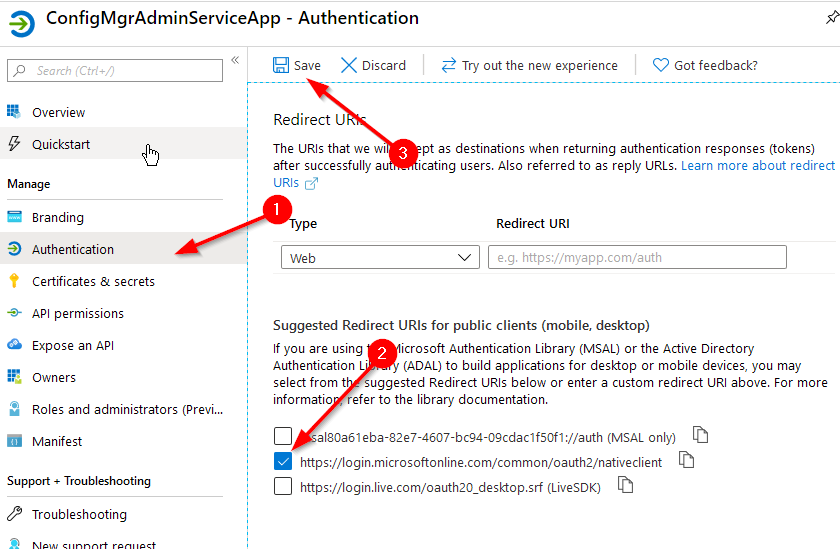
If you’re using a confidential application we need to give the app registration a redirection URI. Select the “Authentication” tab, check the box for “https://login.microsoftonline.com/common/oauth2/nativeclient", then click “Save”. Really this can be anything since we’re not “redirecting” anywhere, but the nativeclient link is the default placeholder for our purpose.
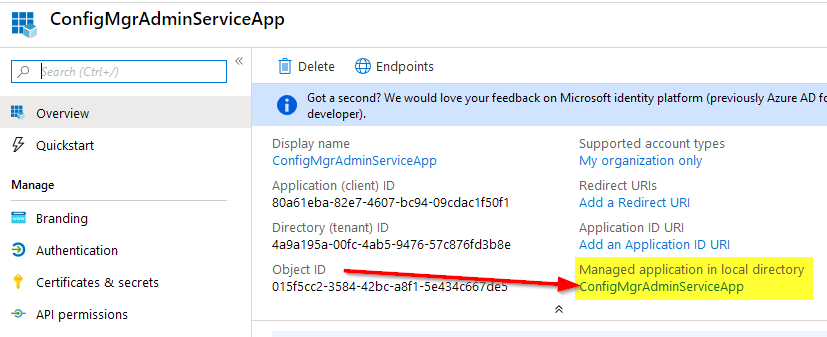
Now you have your app registration completed! You can further lock down a confidential client to only users or groups you specify (although access to the AdminService is still managed by ConfigMgr RBAC, so you may not need to worry about this). To do this, on the “Overview” tab, locate the link below “Managed application in local directory” and then click on it. This will redirect you to the “Enterprise Apps” blade for this App Registration.
Click on the “Properties” tab, press the “Yes” button for User Assignment, and then press the Save button.
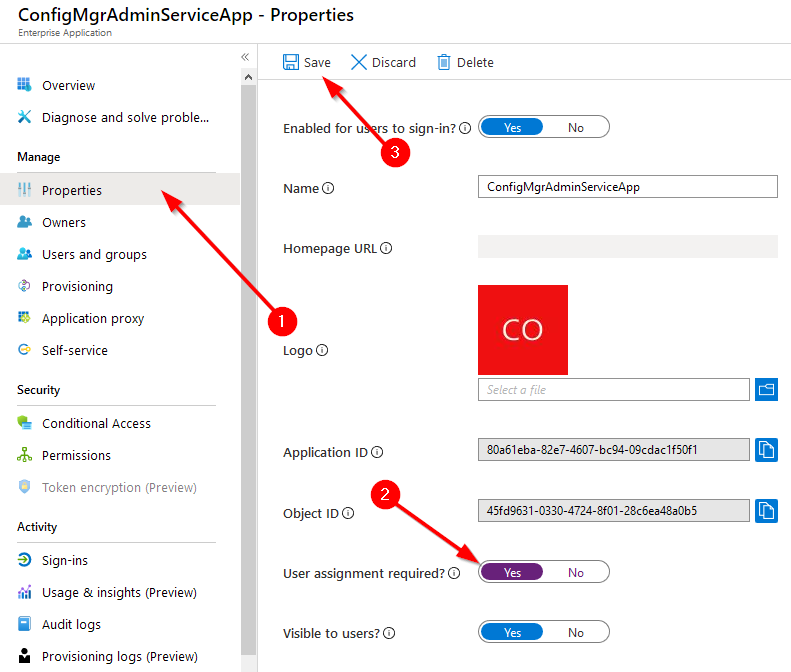
This will force the application to only accept users or groups who are authorized to used the application as defined in the “Users and Groups” tab. Click on the “Users and Groups” tab, click “Add User” and then select the users or groups (Groups require an Azure AD P1 or P2 subscription) you wish to assign to the application.
Accessing Data
Now that you have the app registration completed, you can access the AdminService through Cloud Management Gateway! To access the data you just need to submit an authenticated POST request to your CMG endpoint. Instead of re-inventing the wheel here I’m just going to point you at Sandy’s post. Her script is easy to understand and virtually the same thing that I would write. This script is effectively uses the confidential method of access (interactive credential prompt) and does not use the public method.
The Script: https://gist.github.com/sandytsang/d16da8ec0c0c5dad9a27e0933bb534b8#file-adminservice_cmg-ps1
Final Thoughts
In a future post I will describe how to use the public method so that you can store credentials and pass them in without a prompt for use within a Task Sequence or any other script that you might run non-interactively. Until then, Happy Admining!
Share this post
Twitter
Facebook
Reddit
LinkedIn
Email