


Alrighty, so now we know how to create a window and make a button do something. What about media like images and sounds? In C# you might embed the resource (image/sound) directly in your executable and reference it via an internal path reference. In PowerShell though, short of converting the file to a base-64 value there isn’t a really good way to store file content directly in your script. Nor should there be.
Traditionally when building PowerShell GUIs, either with WinForms or WPF, you’ll generally see a reference to the object and it’s source - e.g. $MyImage.Source = “$PSScriptRoot\Path\To\Image.png”. This is a perfectly reasonable approach, and fairly easy to understand in the code. But if you’re going to wire up a lot of images you might begin to clutter your code.
In PoSHPF I introduce the idea of “Media Resources”. In reality these are based on a concept in WPF/XAML called “StaticResources” but we’re totally using them in a non-standard way. The whole point is to just simplify the source path of an item to just the base name of the file (e.g. if you’re adding Header.jpg to a GUI, you would just reference “Header” in the source and the script wires up the rest).

Creating the Base
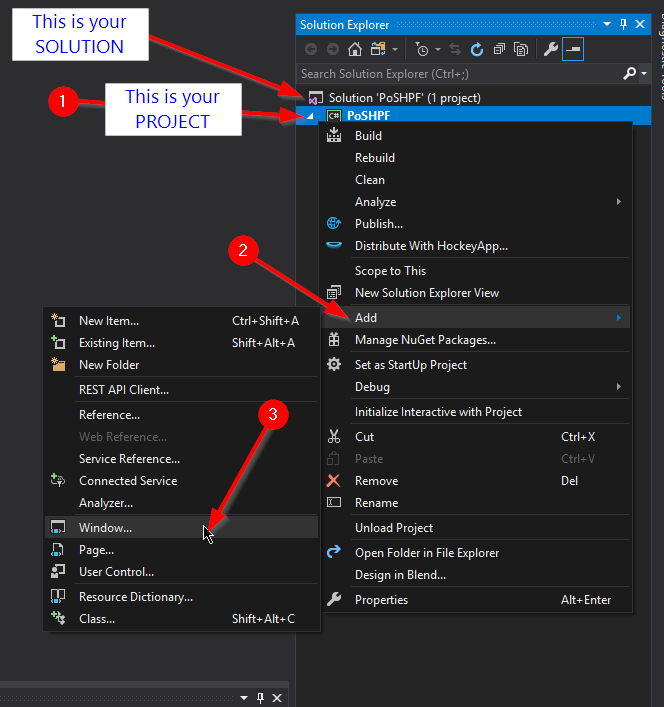
Right now the “Media Resources” support two different types of control - MediaElement (for audio/video) and Image (for… well… Images). These two control types should cover everything we need to do with media. The first thing we need to do is fire up Visual Studio and create a form. You can choose to use the same solution from before if you wish. As a matter of fact, I like to do this because then I can keep all my XAML files in one place. To create a new window within your solution, open the “Solution Explorer” (this should be open already on the right hand side of your VS window) - if you don’t see it you can open it from the menu bar (View > Solution Explorer). Right click on your PROJECT within the solution (mine is called “PoSHPF) and select “Add > Window”
Give your window a name that makes sense - I’m going to call mine “MediaTest.xaml” - and then click “Add”. After creating the window you should be taken right into the designer view for that new window. Let’s do the normal polish stuff - give your window a good title and a reasonable size - let’s say “Hear the Loon!” and 200x200px.
Oh yeah, you’re going to need the following items:
Now inside our window let’s create two new controls. Drag a “MediaElement” into the window (you can resize it however you wish - it will not be visible in this case). Next drag an “Image” control into the window as well. Make sure this one fills the entire space of the window (it should be 169x192px). Your XAML for those two controls should look something like this:
<MediaElement HorizontalAlignment="Left" Height="169" VerticalAlignment="Top" Width="192"/>
<Image HorizontalAlignment="Left" Height="169" VerticalAlignment="Top" Width="192"/>
Now make sure to give both controls a name. We’ll call them “LoonSound” and “LoonImage” respectively.
NOTE
The order of controls in XAML is important. Elements are rendered in the order they are written. So in our case, the sound is rendered first and then the image. This isn’t really important in our example, but imagine a scenario where you might have overlapping elements. If you render them in the wrong order it might not look how you expect.
Finally we need to add sources for the media. We could just reference them in our PowerShell script like $formMediaTestControlLoonSound.Source = “$PSScriptRoot\Loon_Sound.mp3”, but the whole purpose of this framework is to make things cleaner and easier. THIS is where we use the “Media Resources”
Using “Media Resources”
Back in Visual Studio we need to add a source to both of our controls. The way you reference this using PoSHPF is “{StaticResource FILEBASENAME FILEEXTENSION}”. So if your filename for the sound is “Loon_Sound.mp3” then your FILEBASENAME would be “Loon_SoundMP3”. We have to do this via the XAML view - but don’t worry, this is not too scary.
Down in our XAML view, find the “MediaElement” control and add the following attribute:
Source="{StaticResource Loon_SoundMP3}"
Do the same for the “Image” control but use “Loon_ImageJPG” instead. Your resulting XAML should now look something like this:
<MediaElement x:Name="LoonSound" Source="{StaticResource Loon_SoundMP3}" HorizontalAlignment="Left" Height="169" VerticalAlignment="Top" Width="192"/>
<Image x:Name="LoonImage" Source="{StaticResource Loon_ImageJPG}" HorizontalAlignment="Left" Height="169" VerticalAlignment="Top" Width="192"/>
You may notice that the attribute is underlined with a greenish squiggly line. You can safely ignore this. Visual Studio is just trying to warn you that it couldn’t resolve the StaticResource named “Loon_XXXXXXXX”. We don’t care though.
Okay. Now we need to create a new folder in our PoSHPF directory called “Media”. Your folder structure should now look like this:
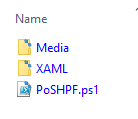
Put those two media elements you downloaded from earlier in the “Media” folder and copy your XAML we just created into the “XAML” folder. Now launch PoSHPF in your favorite PoSH editor and let’s wire up our controls!
Since my XAML is called “MediaTest” my controls will be named:
- $formMediaTestControlLoonSound
- $formMediaTestControlLoonImage
I’m going to add a “MouseDown” event to my image (since there is no “Click” event for Image) and tell my sound to play when I click on the image. Your code will look something like this:
$formMediaTestControlLoonImage.Add_MouseDown({
    $formMediaTestControlLoonSound.Stop()
    $formMediaTestControlLoonSound.Play()
})
Note that I added a “Stop()” first and then a “Play()”. This is because “Stop()” puts the media time back to 0:00:00 - meaning it starts the sound over again. If I didn’t put “Stop()” in first, then the sound would play until it finished and that would be the end of it.
Finally we need to launch our window, so we add:
[void]$formMediaTest.ShowDialog()
to the end of our script. Run it and you should be able to hear the wonderfully peaceful sound of the loon.
If you didn’t - or had other issues, you can download my example from here and compare my code and XAML to yours. If you did hear the glorious sound, congratulations!
If you are a keen observer, you might notice that our loon doesn’t fit the window - there’s actually a little whitespace on the right hand side of our GUI. In the next post we’re going to deviate from PoSHPF a little bit and talk about good layout hygiene in WPF and why it matters. But until then, Happy Admining!
If you want to know the magic behind how these “Media Resources” are wired, continue reading.
The Magic
The way we’re making this work is by creating (or adding to an existing) Resource Dictionary inside our Window Resources in our XAML. A “resource” in WPF is a reusable object that you would plan on using more than once - think of it like an object in PowerShell. A “Resource Dictionary” is a collection of those resources - you can think of it like an array of objects in PowerShell. And the Window Resources would be any resources or resource dictionaries available to the Window itself - you can sort of think of this like a variable’s scope in PowerShell. It’s not a perfect analogy.
So we gather a list of items in the “Media” folder we created earlier and
then loop through them. If any of the file extensions matches a supported
filetype, then we create a new “resource” inside our resource dictionary
with a key of the name of the file without periods (e.g. filename is Loon.mp3,
becomes LoonMP3). In the case of image content we create a new “BitmapImage”
element. In the case of AV content we create a new “URI” element.
To create the “URI” element though, we also have to add an additional XML namespace to our XAML:
xmlns:sys="clr-namespace:System;assembly=System"
So the flow looks something like this:
-
Get list of files in $PSScriptRoot\Media
-
If list > 0, then add the “System” assembly to the Window namespaces
-
If “Window.Resources” doesn’t already exist, create it
-
Loop through all files in media
- If media is Image, create a BitmapImage resource with a source of the “FullName” of the file.
- If media is Audio/Video, create a new URI with a path of the “FullName” of the file.
-
Add the Window Resources to the XAML before it is processed.
Now when the XAML is processed by XamlReader, the window will know of the existence of these StaticResources. So we can now just reference them in the “Source” attribute of the controls themselves.
That’s the magic! Happy Admining!
Share this post
Twitter
Facebook
Reddit
LinkedIn
Email