


Today we’ll kick off Part 2 of the series on building WPF GUIs with the PowerShell Presentation Framework. We’re still in the beginning phases of our GUI building learning, so things will still be simple. I hope you kept a copy of your XAML from last time (the one where we created a label and a button). If you didn’t - here’s a solution you can launch in Visual Studio that has everything we need for today.
Okay, open up your solution and let’s get started!
Naming Our Controls
Now when we’re working with controls in C# we don’t have to explicitly define a name for them. As a matter of fact, in some design patterns, like MVVM, explicitly defining names can be an indicator of “Code Smell”. It’s not a hard and fast rule, but sometimes it’s frowned upon. I’m telling you this because explicit naming is necessary in our case - so if someone tells you you’re doing it wrong, they can come fight me.

We accomplish naming our controls in one of two ways. We can do it from the “Properties” window we used to change the font, etc. or we can manually define it in XAML. Both accomplish the same thing - adding a “x:Name” attribute to the element in XAML. To define the name from the properties window just click (one time) on the control you want to name and then find the “Name” property in the properties window.
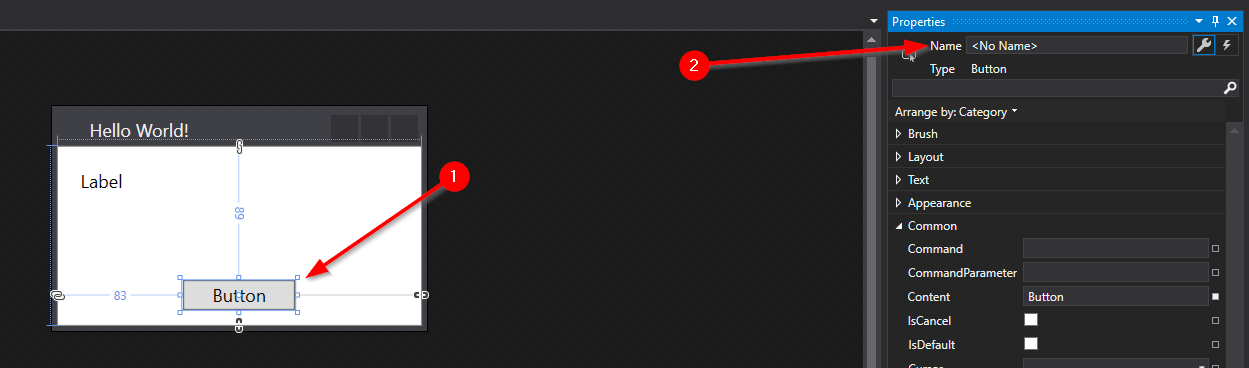
You can set the name to whatever you wish as long as it is unique and only contains a-Z, 0-9, or _. Also, Visual Studio will enforce the name to start with either a letter or an underscore (you can’t start the name with a number). In theory this doesn’t really matter to us because we’re really only using it as an easy way to reference a control later. After adding the name you will see the following added to your XAML code:
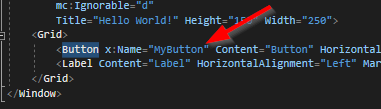
Unsurprisingly, if you want to manually name your control, you just add that information… manually. Now let’s make sure that both our Button and Label controls have names. Save the XAML and copy it into your XAML folder in your PoSHPF folder.
At this point if we just launch PoSHPF and execute it you won’t notice much of a difference. As a matter of fact, the GUI shouldn’t have changed at all. What you should see difference is the creation of two new PowerShell variables ($formMainWindowControlMyButton and $formMainWindowControlMyLabel in my case).
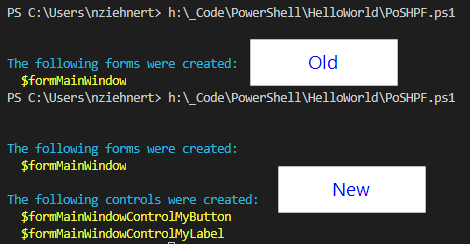
The naming convention is fairly straight forward.
form XAMLFILENAME Control CONTROLNAME
The idea here is that if you have multiple XAML files, they would each have their own controls within them. So the variable is named based on that parent-child relationship.
So now we have these variables… how do we wire them up?
Wiring Up Our Controls
A little background. Each of our controls has a number of properties associated with it (height, width, content, etc.). Additionally our controls also have some EVENTS that are automatically monitored by WPF - like a “Click” event on a button, or a “Mouse Over” or “Mouse Exit” event. Lots of events actually - like in the case of the label, WPF monitors for over 100 different events. These events are described in more detail in Microsoft Docs. Just find the control you want to get the events for, click on it, and then find the “Events” section of that document.
So let’s try this out with our button. Load up your PoSHPF script in your editor of choice and find the section (near the bottom) called “Wire Up Your Controls”. You’ll see an example here, and I won’t be offended if you want to try it out yourself before continuing with this guide (ignore the “BackgroundScriptBlock” stuff for now - we’ll talk about that later).
The first thing to notice is that we access the event similarly to how we would access a property or method of any other variable in PowerShell. The main difference is that we prepend “Add_” to the name of the event. In the case of the “Click” event it would be:
$control.Add_Click({ScriptBlock})
So let’s take the button control that we just named and add a click event handler to it. In my case since I named the button “MyButton” my code will look like this:
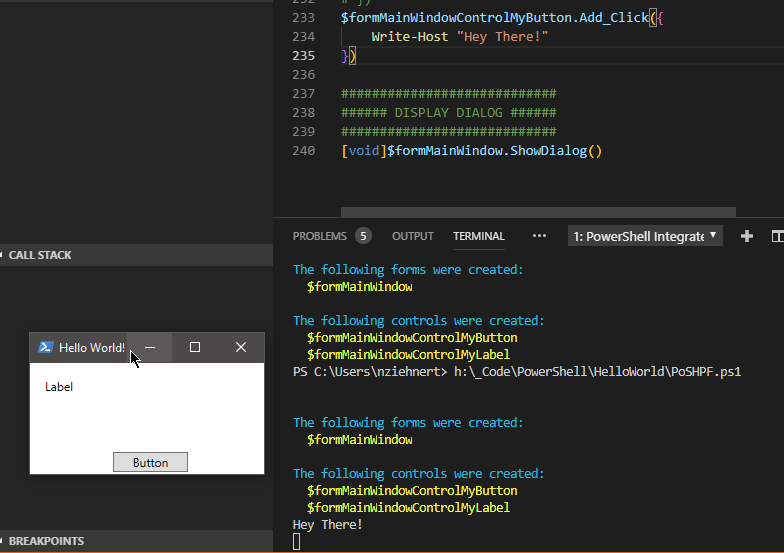
$formMainWindowControlMyButton.Add_Click({
    # do stuff here
})
I’m adding the script block “{}” directly inside of the click event handler. This is the code that will execute anytime the “Click” event is fired (meaning when I click on the button). For now let’s do something simple like “Write-Host ‘Hey There!’”. Your code should look something like this:
$formMainWindowControlMyButton.Add_Click({
    Write-Host "Hey There!"
})
Now let’s run the script and see it in action!
Writing data back to the console isn’t really useful in our case. I mean the whole point of writing a GUI is so that you do everything in the GUI right? So maybe instead we can make the button change the text inside the label. That’d be cool right?
Or at least useful?
No?
Okay. “Useful for the purpose of learning something new”
Back in our script block let’s get rid of our Write-Host line and add the following line:
$formMainWindowControlMyLabel.Content = "Hello World!"
and then let’s run it again.
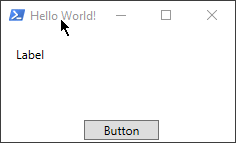
Whoa! Congrats you just wired up your first control! Neato!

“Hold up. Why is the label property called ‘Content’ and not ‘Text’?”
Bonus Round: Content Control
If you attended my session on WPF at MMS you’ll know that WPF is a very open markup language. Unlike WinForms, a control like a button that would traditionally only contain text doesn’t need to contain only text. It could contain a picture for all WPF cares. So unless the control explicitly only accepts one type of content (such as text in the case of a TextBlock or TextBox), you will generally find that the content of a control is just that… “content”.
Expanding this further, it doesn’t even have to be a single control! You could technically nest a button, inside a button, inside a button, inside a… you get the picture. I’m not saying it would be even close to being usable, but you still have that opportunity.
If you have interest in the behind the scenes of the script and how it wires up these controls, then read on. Otherwise, until next time, Happy Admining!
The Magic
There’s not a lot of secret sauce to this particular part of the script. It’s using things natively built into WPF (and more specifically, PowerShell’s implementation of the WPF types). Of note here, we’re making a minor modification to the name of the Name attribute, and then searching for all of the named controls.
We actually did the rename of the function early on in the script. On line 51, we just do a “replace” wherever we find “x:N” and replace it with just “N”. So in effect x:N becomes N. We then take our loaded XAML (from lines 110-117) as XML, and search through it for any nodes with a “Name” attribute. Then we search the parsed XAML for the actual objects themselves (i.e. instead of just an XML node, we’re finding the actual System.Windows.Controls.Button object that we created when we parsed the XAML when we used the XAMLReader class in lines 110-117).
Now how are we wiring up the controls, and why does “Add_” need to be prepended to the name of the event? Enter “Syntactic Sugar”… or rather the lack thereof for .NET events in PowerShell. If you are tired of my writing PowerShell MVP Keith Hill has a very in-depth post on the “why” available here. Breaking it down in a nutshell, in other languages like VB.Net and C#, there is some “Syntactic Sugar” (things that make coding easier for us humans) that allows you to subscribe to an event using “+=”. So in C# you might write something like:
MyButton.Click += Some_Function
This bit of code gets interpreted at compile time to actually refer to a method called… “add_Click(Some_Function)”. So even though PowerShell doesn’t have any sugar to handle this automagically, you just need to refer to the event’s subscribe method (e.g. add_Click) to be able to do something when that event takes place.
Neato!
Anyways, thanks for hanging out and as always Happy Admining!
Share this post
Twitter
Facebook
Reddit
LinkedIn
Email