


Had a client reach out to me last week after installing the new Windows 10 ADK and the Windows PE addon. A script that I had created for them to assign machine names, OU location, and time zones ceased to function. It would open for about 2-3 seconds and then immediately close, causing the task sequence to fail due to the exit code from PowerShell. I spent a bit of time troubleshooting the issue with him and isolated it to the following error:
System.DllNotFoundException: Unable to load DLL ‘UIAutomationCore.dll’: The specified module could not be found. (Exception from HRESULT: 0x8007007E)
Apparently a component important to the operation of WPF (Windows Presentation
Framework) was either corrupt or incompatible with the new ADK WinPE. My
initial thought was just replacing the file before running the script might
do the trick, but that didn’t work. (EDIT: I had grabbed a copy from a Windows
10 workstation, and not from PE… this process does work and I’ve updated the
post to reflect this) I also had a wedding this last weekend to
attend so I didn’t get to put much attention to the issue and planned to
follow up with some more troubleshooting today. Well when I came into the office
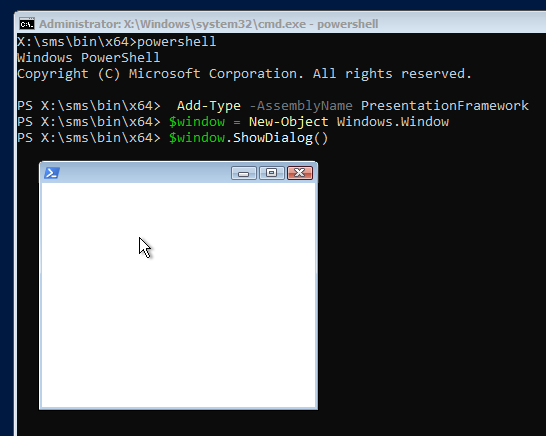
Twitter user @ferozekhan267oa already found
a quick workaround:
Boom. Quick and simple. If you NEED to have the new ADK now here’s how you make it happen in your environment.
Requirements and Files Needed
You will need the following files from the 1803 WinPE boot image. I’ve included them here for now (until someone says otherwise) since they’re freely available, just a pain in the you know what to get (5.5gb download, extraction, etc.).
- x86: UIAutomationCore.dll
- x64: UIAutomationCore.dll
Replace the File Before Your GUI Launches (The Easy Way)
The easiest way to fix this issue is to include the UIAutomationCore.dll files above with your script content and perform a simple copy. The file just needs to end up in place of the existing UIAutomationCore.dll in X:\Windows\System32. If you don’t have a script to run - you can just package up the DLLs and replace them using the following batch script.
rem Download both UIAutomationCore.dlls
rem Rename to UIAutomationCorex86.dll and UIAutomationCorex64.dll respectfully
if %PROCESSOR_ARCHITECTURE%==AMD64 copy "%~dp0UIAutomationCorex64.dll" "%WINDIR%\System32\UIAutomationCore.dll" /Y
if NOT %PROCESSOR_ARCHITECTURE%==AMD64 copy "%~dp0UIAutomationCorex86.dll" "%WINDIR%\System32\UIAutomationCore.dll" /Y
So create a package with the two DLLs (renamed to reflect architecture) and create a .BAT or .CMD in that same package with the content above. Create a program to run the .BAT or .CMD file and then run it as a step in the task sequence before your WPF script or EXE runs and it should be working!
If you need a primer on creating packages in ConfigMgr there are plenty of good guides. Microsoft has also documented the process here.
Manually Adding the Files (The Hard Way)
Unfortunately, you can’t change the file using the ExtraFiles option of an MDT boot image. The reasons for this are not particularly clear (other than access denied issues), so we’ll need to update the files manually. First we need to mount the image to a temporary/scratch location. Locate your boot image - I’m going to update the default image so that changes I make to the boot image until I install the next version of the ADK will persist this change.
This file is typically located in your ConfigMgr installation directory:
X:\Program Files\Microsoft Configuration Manager\OSD\boot\x64\Boot.wim
X:\Program Files\Microsoft Configuration Manager\OSD\boot\x86\Boot.wim
To mount the image, we need a scratch location to store the data. Create a folder somewhere we can extract the files to and remember that path. Next open up an administrator command prompt and type the following:
dism.exe /mount-wim /wimfile:X:\Path\To\Boot.wim /index:1 /mountdir:%TEMPORARYDIRECTORY%
Remember that %TEMPORARYDIRECTORY% is a reference to the scratch directory form earlier. Once mounted, the you will have access to the files that I’ve attached above but you will not be able to write to them. Run the following commands to take ownership of the files:
takeown /F "%TEMPORARYDIRECTORY%\Windows\System32\UIAutomationCore.dll"
icacls "%TEMPORARYDIRECTORY%\Windows\System32\UIAutomationCore.dll" /grant Administrators:F
Now you should be able to replace the UIAutomationCore.dll file. You might still have to copy it manually because UAC might throw a fit. After you’ve replaced the appropriate file commit the changes back to the boot image.
dism.exe /unmount-wim /mountdir:%TEMPORARYDIRECTORY% /commit
Boom. Now let’s get it to our distribution points!
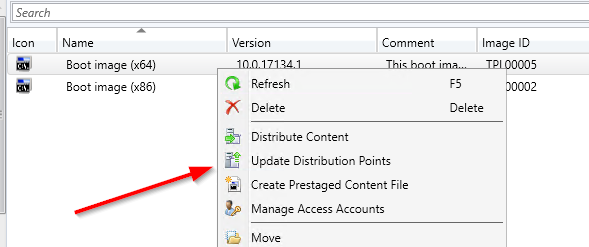
Redistribute Your ConfigMgr Boot Image
Now that we’ve added it to the core boot image for ConfigMgr (architecture dependent) you’ll want to redistribute your boot image. Locate your boot image in the console, right click on it, and then select “Update Distribution Points”
Walkthrough the standard update process, but make sure that you do NOT check the box to reload with the current version from the Windows ADK.
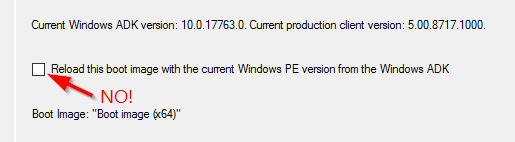
Wait a bit for the boot image to rebuild and presto! You have access to the old UIAutomationCore.dll file that is necessary to make WPF work (currently) in WinPE v1809.
Closing thoughts
I will update this post when the next release that fixes WPF is released. Until then… not much else to say here other than - if you can’t afford to be down, don’t upgrade right away. Let those who have that ability upgrade first and catch the bugs for you. It seems like there is always some kink in the hose to work out before things are production ready. Anyways, happy admining!
Share this post
Twitter
Facebook
Reddit
LinkedIn
Email