


Let’s face it - some probably all of us were managing our local Administrator password via Group Policy (or maybe you’re not managing your password at all… tsk tsk). This was great until Microsoft published the location of the keys used for encrypting that data and had to disable the ability to store passwords in Group Policy since they were no longer “secure”.
Crap.
Now if you’re in an environment with more than say, 10 machines, you don’t want to go around updating the admin password on every machine, every time you need to change it. If you’re in an environment like mine (>2000 machines), that would be a near physical impossibility. So what solutions do we have?
Well, we could write a PowerShell script to do the work. The downside to a local PowerShell script is you have to somehow be notified of the password change, keep track of all those passwords, and at some port or another that password is going to pass cleartext or be stored cleartext. The downside to a remote PowerShell script is that unless every machine is online when it runs, you have no guarantee that every machine will be updated.
Time to run LAPS (Local Administrator Password Solution) around your desktop security. LAPS is a nifty little utility with a nice GUI front end to manage and track your passwords SECURELY in Active Directory.

What exactly is LAPS?
Well, it’s a little bit of Active Directory magic mixed with Group Policy CSEs (client-side extensions). Basically the flow looks something like this:
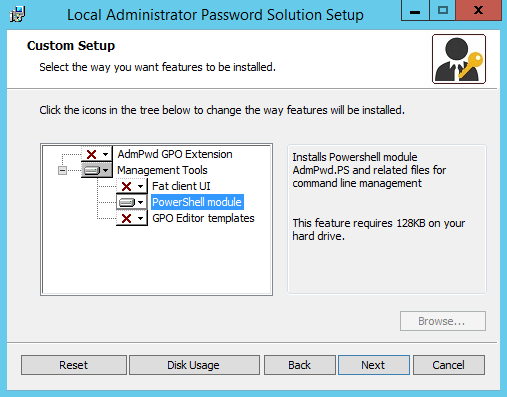
The installation procedure is simpler than it looks (don’t let AD extension scare you):
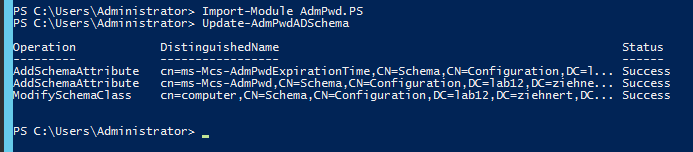
Once the installation is complete, you need to launch PowerShell with your Schema Extension account. Import the LAPS module by typing the following command and pressing ENTER
Import-Module AdmPwd.PS
You won’t get a return message unless importing was unsuccessful. In which case you did not install the correct components as detailed above. After this is completed, to extend the schema type the following command and press ENTER
Update-AdmPwdADSchema
This should output the following result - or similar to it based on your domain common names:
The schema has now been extended, but by default only “Enterprise Admins” and “Domain Admins” groups have access to these attributes. This is done on a parent OU basis, just in case you store your computers under multiple parent OUs. To add groups to the allowable viewers type in the following command, replacing “OU Name” with the short name of the OU that houses your computer objects, replacing “Users or Groups” with a comma-separated list of user or group short names you wish to delegate access to, and press ENTER
Set-AdmPwdReadPasswordPermission -OrgUnit "OU Name" -AllowedPrincipals "Users or Groups"
The output of the command should look something like this depending on your domain and OU names:

Finally we need to allow the computers to write their passwords back to AD. Again this is done on a parent OU basis, so you will need to do this for every parent OU that houses computers in which you want them to write passwords back to AD. From the PowerShell terminal type in the following command, replacing “OU Name” with the short name of the parent OU that houses your computer objects, and press ENTER
Set-AdmPwdComputerSelfPermission -OrgUnit "OU Name"
The output of the command should look something like this depending on your domain and OU names:

Now you’re all done with the Active Directory schema extension and permission setting. In the next post we’ll look at installing the client side extension on workstations via GPO or SCCM.
Thanks for reading, and happy admining!
Share this post
Twitter
Facebook
Reddit
LinkedIn
Email